Tuesday, February 15, 2011

Project Cave Kraken

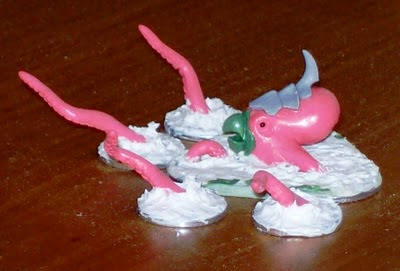
Cave Kraken, Watcher in the Water, Cthulhu, or whatever you call it, every one needs a tentacled beasty to lie in wait for unsuspecting adventurers.  I'll start by showing a picture of the completed project.  As usual, Friar Tuck (an Airfix Robin Hood set figure) and Conan (a Caesar Miniatures Adventures set figure) make their appearance for scale, as well as the Scale Picture (the scale picture).

(Click on the image for a larger version)
This project was a lot of fun.  It began when I saw a tube of plastic kids toys at Hobby Lobby.  I found a cute pink octopus inside the tube, at least it was cute on the outside, I could sense the evil inside just waiting to be released.  The picture below shows the contents of the tube and the red circle give you a glimpse of how the octopus looked before being converted to the Kraken.

(Click on the image for a larger version)
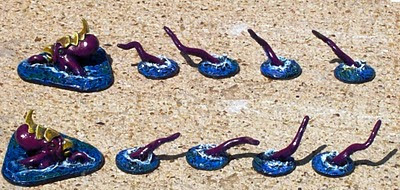
I took an Exacto knife to the octopus and chopped off all of the tentacles.  I then glued the body to the base.  I took a small bit of tentacle and glued the small loop of tentacle in front of the main body.  Next I  added an armored plate from a GW Tyranid sprue and sculpted the beak.  The beak worked out perfectly, it looked exactly as I pictured it in my head.  I then glued some of the left over tentacles to separate bases and it was ready for the basing.  I sculpted the waves on the bases out of paint-able latex caulk.  I attempted to sculpt some white capping waves as the kraken and his tentacles rose from the depths, and again, I lucked out because the looked exactly as I had hoped.

(Click on the image for a larger version)
I then painted the little beasty various shades of purple and blue for the body, yellows and tans for the beak, light blues for the suckers, and green for the eyes (he just seemed to be the jealous type).  The water was primed black, dry brushed white, and then painted with several different colors of diluted ink to achieve a water effect.  I then touched up the white caps with some white paint.  The last step was to give him a gloss coat of sealant, so he would appear to be wet

(Click on the image for a larger version)
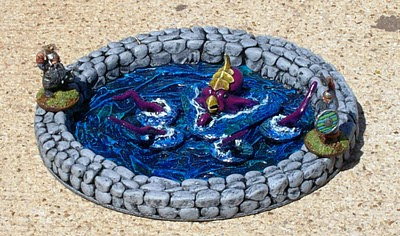
Here is what the cave Kraken looks like on the game board when he rises from the depths of the "Well of Doom".  You know the dwarfs are wondering who ordered calamari  and are hoping they are not on the menu.

(Click on the image for a larger version)
It is amazing what a little time and effort can do with a humble toy.  From cute to killer in nothing flat.

Questions and comments are always welcome.  Thanks for reading...


Copyright © Ron Hamilton 2011, All Right Reserved.

Tuesday, February 8, 2011

Minatures Scale Picture by Christopher B of the blog "A Rust Monster Ate My Sword"

I use a miniature scale picture in lots of my blog entries.  I think it is very handy to see how different figures match up against it.  As usual, Friar Tuck (an Airfix Robin Hood set figure) and Conan (a Caesar Miniatures Adventures set figure) make their appearance for scale, as well as the Scale Picture (a scale picture).

(Click on the image for a larger version)

You may one one of your own, if so, do not despair.  All you need to do is to click on the Miniature Scale Picture link and you can have one of you own.

          Miniature Scale Picture

The picture looks way to big when viewed in your browser window, but due to the magic of a 300 dots per inch setting hidden deep in its JPG soul, it prints out perfectly.  I printed mine using Windows Paint.  If you would like to visit the blog of the fellow who created this neat little gadget, click the link below. 

          A Rust Monster Ate My Sword

Thanks Christopher B. for creating such a useful little picture.  I have a laminated copy I keep in my wallet for those time when I wonder, "Will this work with scale X figures."


Thanks for reading...


Copyright © Ron Hamilton 2011, All Right Reserved.

Saturday, February 5, 2011

Project Legolas

I created my 1/72 version of Legolas in January of 2007.  I was looking at the up coming Caesar Fantasy lines, that didn't come out until the end of 2007, and I just got impatient.  The front and back of the completed figure can be seen below with Friar Tuck (an Airfix Robin Hood set figure) and Conan (a Caesar Miniatures Adventures set figure) making their appearance for scale. 

(Click on the image for a larger version)
I chose the Hat/Airfix Merry Man's body on the right because it has the best gear and a nice dynamic arrow shooting pose, but his bearded face would never do for an elf.  So I used a bald head from another Merry Man like the one on the left and did a head swap.  At this point you may be asking yourself , a bald elf will not work any better than a beardy one.  I have to admit the logic is sound, but since I planned to sculpt on pointy ears and longish hair adding hair plugs for the bald head didn't seem to be a problem.  As you can see I also added a quiver of arrows, an arm guard, and high boots, when I sculpted on his ears and hair.  The end result was an acceptable elf figure.

(Click on the image for a larger version)
I decided to post this after reading Paul's Bods Blog about Airfix Robin Hood figure head swaps.  Thanks to Paul for the motivating me to showing off my first plastic 1/72 fantasy figure. 

Thanks for reading...


Copyright © Ron Hamilton 2011, All Right Reserved.

Tuesday, February 1, 2011

Project Hobbit - Phase 3

I have completed priming and putting the base coat on my hobbit.  So far I am happy with how he is turning out.

I started the priming with a light coat, almost just a misting, of Krylon Plastic Primer.  I include this shot just to show how much spray primer I apply.  I like to use light coats of paint when painting plastic figures.  I find if you get the coats of paint too thick it tends to flake too easily.  As  usual, Friar Tuck (an Airfix Robin Hood set figure) and Conan (a Caesar Miniatures Adventures set figure) make their appearance for scale.  Also making an appearance in the blog is a Caesar Miniatures Adventurers set female fighter figure.  I have replaced her sword with a war hammer and primed her with Krylon spray primer.


(Click on the image for a larger version)

In the next picture, I have applied two coats of black latex house paint.  I find it adheres well to the Krylon spray primer and the latex paint has some flex and give if the plastic figures are bent.  I also take a soft bristled tooth brush and buff the figure between coats of paint.  The buffing smooths the primer between coats, sort of the way you can sand primer between coats when painting a car.  It also tests the bond between the primer and figure early in the painting process.  I hate to finish painting a figure only to find out the primer failed to bond.   


(Click on the image for a larger version)
I then applied a base coat.  The picture below speaks for itself.  I did try to paint some yellow trim on the green vest.  It seemed like a good idea, but I do not really like the effect.  I think I may change it when I start painting highlights and details.  Even if I just leave the vest plain with no trim it should look good on the table top.


(Click on the image for a larger version)
I have included a shot of the back of the figure, to give a complete view of the base coating process.


(Click on the image for a larger version)
I am looking forward to doing the detail painting and putting a protective finish on this little guy so he is ready for the table top.  So it is time to quit writing and go back to painting. 

Thanks for reading...


Copyright © Ron Hamilton 2011, All Right Reserved.